Drywall is pretty tough stuff, but it’s not indestructible. From kids flinging toys to doorknobs, the occasional ding or hole in drywall can occur for any number of reasons.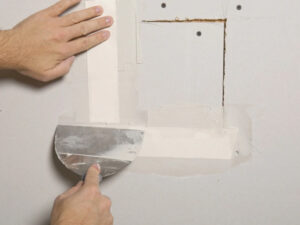
Most holes can be fixed with spackle or joint compound and a putty knife. But larger dents or holes can require a patch kit and mesh tape, as well as more tools. However, if you need some professional help, you can call Drywall Repair Las Vegas.
Drywall tape is used to help cover and hide seams between two pieces of drywall. It minimizes movement between drywall sheets and helps keep the compound applied to the seams from cracking. When a crack forms in your wall, it’s essential to repair it quickly to avoid further damage.
Many homeowners find themselves dealing with a drywall repair job for a variety of reasons. Holes are usually caused by a nail that’s not fully set, but they can also be the result of paint removal or a child flinging a toy. Moisture damage from water leaks can also cause drywall to become swollen or warp.
Whether it’s from a leak or a bump from construction, the first step in fixing a hole is applying a small amount of spackle or lightweight joint compound to the hole. Make sure the patch is completely covered and smoothed out with a putty knife, feathering the edges to blend it into the rest of the wall.
For drywall repair jobs that require more extensive coverage, there are larger types of drywall tape available. These tapes are a little more expensive, but they offer an increased width of coverage and are less prone to wrinkles.
Mesh drywall tape is another option for repairing drywall seams and holes. Unlike paper tape, which requires bedding in wet mud, mesh tape is self-adhesive and sticks directly to the drywall. This saves time in the taping process by eliminating one step. Mesh tape is also best suited for flat joints and outside corners. Paper tape is still recommended for inside corners.
Joint Compound
Joint compound is the thick gypsum-based paste that covers and embeds drywall tape, creating a seamless base for paint on walls and ceilings. It dries to the consistency of cake frosting and needs to be lightly sanded after drying to create a smooth surface. It is also used to repair cracks, holes, and other blemishes on walls and ceilings.
Joint compounds come in premixed form and are usually sold in 5-gallon buckets. They include all-purpose lightweight joint compound, which is ideal for first coats and embedding tape; all-purpose medium joint compound; and all-purpose heavy joint compound. The latter is more expensive but dries much faster and can be used for top coats. Drying time varies depending on the humidity, and it takes about 24 hours for a full cure.
There is also a quick-setting joint compound, which dries chemically rather than through evaporation. This is great for fast projects but doesn’t offer the same sandability as a regular compound. There is also a vinyl-base ready-mix joint compound that has a similar texture to a regular compound but is 30% lighter and produces less airborne dust while sanding.
The main difference between joint compound and spackle is that joint compound is typically used for covering the seams between two pieces of drywall, while spackle is more often used for filling in holes. Using a trowel, apply a thin layer of compound to the seams. Allow to dry and sand until the surface is flush with the surrounding wall. Then add a second and third coats of compound to the patch and sand again until it is smooth. Then apply a coat of paint to the wall.
Joint Tape
Drywall tape, also called drywall joint tape or gypsum board joint tape, is used to reinforce the seams between sheets of drywall. Its high tensile strength makes it effective at resisting cracking and stretching, while its positive crease simplifies corner applications. Besides being used for joints, drywall tape is often applied to corners, around windows and doors, and any other area that is subject to stress.
When using drywall tape to repair a hole or crack, it’s important to prepare the surface with a thin layer of mud before applying the tape. This step ensures that the tape will bond well with the wall and provides a smooth surface for painting. A good putty knife, such as the Hyde Tools Black & Silver 6-Inch Flexible Joint Knife, is ideal for this job because its flexible blade spreads the mud evenly over the area.
After applying the initial coat of mud, check the wall for blips or bubbles in the drywall tape. These indicate that there isn’t enough mud on the wall or that you weren’t pressing the tape firmly with your drywall knife. Either way, remove the bleb with fresh mud and apply another coat of mud to the tape, ensuring that it is pressed firmly into place.
When working with a tapered or flat seam, you should choose between paper and fiberglass joint tape. Paper tape is more affordable and offers the same benefits as fiberglass tape, including resistance to cracking and stretching. Fiberglass tape, on the other hand, has a higher tensile strength and is suitable for use in areas that will be subject to stress, such as corners near doors and windows.
Sandpaper
The final step in patching drywall is sanding the dry compound, which removes ridges and blends the edges of the hole. This is done with a sponge or sanding block and proper-grit sandpaper to ensure the surface is smooth for painting. While it might be tempting to skip this step, it’s important that you don’t, as uneven surfaces will affect how paint adheres and will leave behind gouges on your wall.
To sand the dry compound, start by wetting a large sponge with water and wringing it out. It should be damp enough to dissolve and loosen the hardened joint compound, but not so wet that it will drip. This allows you to work the sandpaper without getting too much mud on it, which could mar your new patch and lead to more time and money spent on repairs.
While there are a variety of sandpaper sizes available, the best type for drywall repair is between 120 and 150 grit. This is fine enough to create smooth surfaces but coarse enough to sand out imperfections quickly. If you want to make the job easier, consider using a random orbital or a proper drywall sander, which helps distribute pressure evenly and minimizes dust buildup.
Another option is a sanding screen, which is designed with holes that allow dirt to fall through it rather than build up on the sandpaper. This can help extend the life of your sandpaper and prevent it from becoming too clogged as you work. Finally, for wet sanding, try to limit it to two passes, as too much moisture can soak the drywall and lead to craters, valleys, or melted spots on your walls.
Paint
Depending on the size of the damage, you may be able to touch up the spot and blend it into the wall with a dab of paint. However, larger blemishes and holes require repainting the entire room. For best results, choose a paint that’s low in VOCs, biocide-free, and free of formaldehyde. Primer is also important, as fresh joint compound and drywall soak up paint like crazy without primer to seal them and create a consistent surface.
Before you take a roller to the drywall patch, make sure it’s dry and sanded. Then, use a drywall putty knife to smooth the surface and feather the edges so it blends with the rest of the wall. Once you’re ready to apply the paint, be sure to let it set for a few days so the color deepens.
Small drywall repairs are well within the abilities of most DIYers, and a repair kit or patch can help you get the job done right. But if you’re looking to save time and money, it’s worth considering hiring a professional. Drywall contractors have the skills and tools necessary to complete the repair quickly, efficiently, and with minimal mess. And they can save you from costly mistakes that could result in costly additional repairs.